
October 2012 - Shasta Renovation
The saga continues. I wanted to have Shasta on the road by the end of October, but it was wishful thinking. We are within a few weeks though.
Progress:
After the insulation went in and was taped, the roof went back on. This went smoothly but it took time to make sure it lined up. The upper sides were installed using old screw holes and lining up the window openings. Then the roof was lowered back onto the trailer and aligned with the top of the front windows and roof vent opening. New butyl tape was run between the roof overhang and the wall siding, then the overhang pounded over and pressed against the siding. As the original was done, small nails were used to hold the overhang in place. I mostly held a large wooden block at the roof edge and formed the roof overhang with a plastic dead blow hammer. This worked well. I'm waiting for the front and rear skins before re-installing the drip rails.
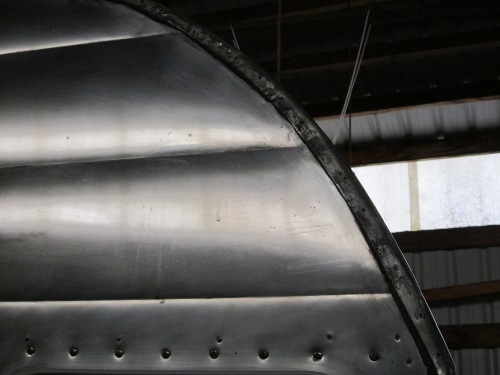
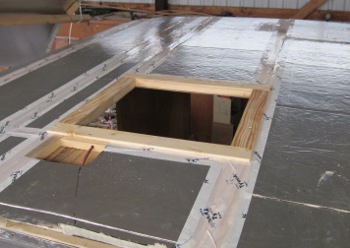
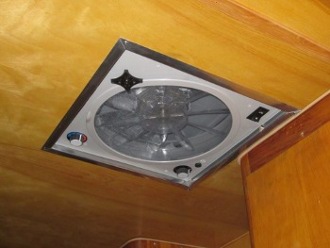
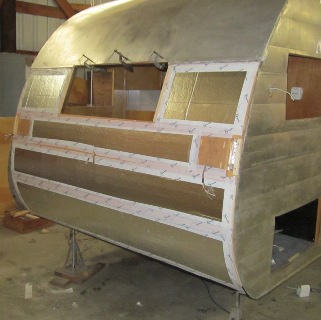
Before the roof went on, I decided to raise the framing around the vent 1/4". I saw this a couple of places as a good idea and is to allow water to drain away from the vent rather than pool at the vent. Once the roof went on it was routed slightly to fit the vent framing. I used a router speed control to slow the router speed and a little A9 Aluminum Cutting Fluid. This combination, with a flush trim router bit, worked very well in routing this thin aluminum skin back to the framing. It worked well here and in trimming the skin for other windows, refrigerator vents, etc. Finally the Fantastic Fan was wired in and the original aluminum trim was re-installed inside.
 |
 |
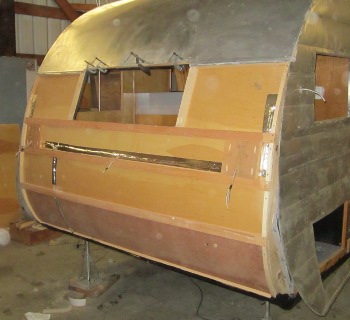
The back of the trailer was framed in once the roof line was established. This was easier, and assured a better fit, than doing this from measurements before the roof was in place. The running lights were wired including a ground wire from the plug (rather than depending on the trailer skin for a ground). Once the lights were wired the insulation went in.
 |
 |
I've always planned on doing an undercoat but wasn't sure how to go about this. There were discussions of using Herculiner undercoating on the Vintage Shasta Trailer Forum. I ordered a kit (gallon) through Amazon and applied it. It's messy applying this with a brush and roller to the bottom of a small trailer. I used very old clothes, safety glasses and a carbon filter mask. Even with the mask I nearly gassed myself crawling around under the trailer with a roller. I don't think you can do this without dropping some on the floor. The worst part was resting my head on the ground, getting this polyurethane paint with rubber bits in my hair. If you try this do wear a hat of some kind. The directions called for two coats (in a pickup bed). However, I used about 4/5 of the gallon on one coat and couldn't have done a second coat even if I'd had the paint. One coat, with touch up, seemed to cover well though. I did sand blast and paint the metal frame with POR-15 previously, the undercoat is mainly to protect the wood. Won't know for years how well it worked but it look like it may hold up. A real pain to apply though.
I re-attached the lower side skins sliding them into the upper skin's Pittsburgh seam. I attached the bottom using existing screw holes. It originally just wrapped under the wood framing and was nailed. Instead of this I put a strip of butyl tape between this under-hang and the framing followed by screws to compress the butyl between the aluminum skin and framing. Maybe not the best solution but way ahead of the original.
I used the technique described above to route out the vent openings for the refrigerator. I have some white vents to cover these. I'd really like to find some aluminum vents but could not find a supplier.
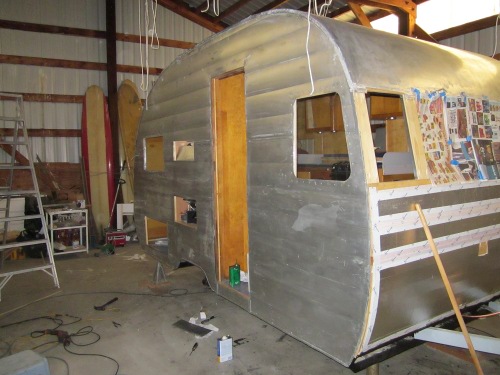
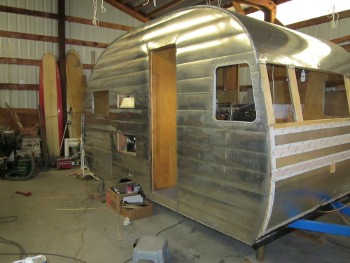
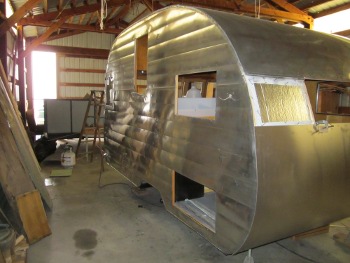
I decided it would be much easier to do an initial polishing before the windows, doors and eyebrows (drip caps) were installed. I ordered a kit from Vintage Trailer Supply for polishing. Expensive but a complete kit and no more than trying to get the pieces locally. I ordered some Nuvite polish (F7 & C) along with the kit. We'd spent considerable time striping the paint in preparation for polishing. We've never planned to get a mirror polish on this trailer, too many dings and scrapes, but just a shinny aluminum finish. I started with the Nuvite F7 but soon switched to a rougher buffing compound we already had. I may go back to the F7, and maybe even the C, but for now the buffing compound gave us an OK finish. We'll likely finish up the eyebrows, doors, etc when they're on and call it good for now. Maybe come back and polish more before a rally, but maybe not. For now we need to go camping.
 |
 |
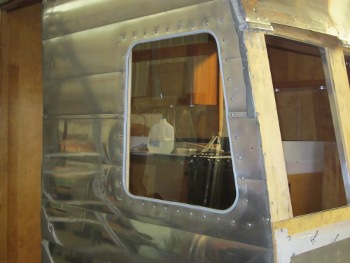
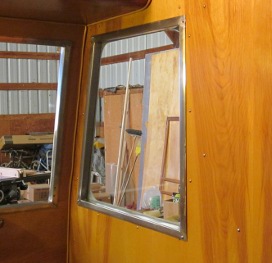
I finally installed the side dinette windows. See the section on Dinette Windows for the blow by blow details.
 |
 |
There were some hangups obtaining aluminum for new front and back skins. The first supplier (Klamath Metals) ordered two sheets of 4'x8' 0.032 aluminum. It took about a week to obtain these but they were damaged in shipment. I inquired several times what they planned to do and the timing for a re-order. I waited about a week for them to get back to me. They did not, and never did get back to me. So I ordered two sheets through Heaton's Steel and Supply. Just missed their weekly order so this took another week. But the order came without problem and was delivered directly to the sheet metal shop (United Mechanical Contractors). I'd given them the cuts to get the front and back skins as well as those beside the front and back windows. I took the cut pieces and fit the large front and rear pieces to the trailer, this since the shapes aren't quite rectangular. I took these back and they put in the required Pittsburgh seams and the 6" breaks. Very reasonable price, I was happy.
I'm now in the process of fitting the skins to the trailer. These new skins will allow the sides to fold over the same as the roof joint. I'm hoping this will be more leak proof than the original, time will tell.
To Do:
We're making good progress, but it'll be a couple of weeks before we can go camping. We still need to:
- Finish Installing the Front and Rear Skins
- Re-install the drip and awning rails
- Rebuild and install Utility Doors (one nearly done)
- Rebuild and install Entry Door and Screen Door (nearly rebuilt)
- Re-install Hehr Windows (already refurbished)
- Re-install eyebrows
That should get us on the road, or at least to the somewhat heated storage unit. Once there we need to finish a few items that are needed or are on the to do list. But the looming cold weather won't be as much of a problem. These items include:
- Touch up polishing of doors, eyebrows, etc.
- Finish plumbing for sink, supply and drain
- Curtain rods and curtains
- New Table
- New cutting board
- Sink Cover
- Re-build front window rock guard
It is getting quite close. However, there's at least a couple of weeks work left to complete the first list. No more predictions, but I promise we'll be on the road soon.