
August 2009 - Shasta Renovation
New Floor
The major accomplishment this month was installation of a new floor and wheel wells.
We replaced the floor joists with planed pressure treated 2x4s. The walls had to be jacked up to replace the outer most since the walls are screwed to these joists. Did one joist at a time and believe alignment was maintained.
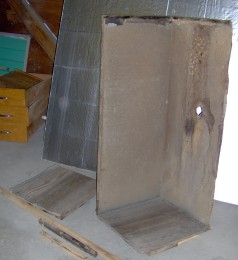
The original wheel-wells were sheet metal on top and inside but plywood on the front and back. This doesn't seem optimum to me as the plywood is exposed to the outside. The pictures show the original wheel-wells. The right shows the assembly with the upper plywood end removed and on the ground. Interesting to note in the left photo there's a hole in both left and right fender. One is for the icebox drain and, I'm convinced, the left dripped gray water. The gray water plumbing was since modified for an external gray water tank. How times have changed since 1955.
 |
 |
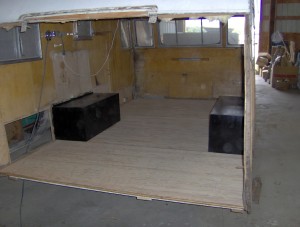
I decided to replace these with new sheet metal assemblies. I took a sheet of 20 gage sheet metal and constructed new wheel wells. The original were lighter, 24 gage or so. Luckily I had access to a sheet metal shear and break. I fabricated one piece for the top and inside with flanges, then front and back sides with flanges. The assembly was then welded together.
The birch plywood interior extended to the bottom of the wheel-wells on the outside. This matches the way the walls are constructed with the birch plywood extending to the bottom of the side joists. Both expose the birch plywood to the weather. I think the birch plywood wicked moisture up causing wood rot all around the base of the walls. I recently looked at a trailer restoration web site, I believe for a Serro Scotty, but can't now find the site again. This restoration used sheet metal on the outside of the wheel-well as well. Couldn't tell if this was original or not. It made sense to me as it kept the birch ply away from the outside. So I fabricated and welded on additional sheet metal "skirts" which extend over the outside of the wheel-wells.

The lower flanges fit below the flooring to keep the flooring plywood away from the weather. I plan to run the birch plywood wall boards down to the flooring and to the fender-wells. This should protect them better than the original scheme.
3/4" plywood was used to replace the original 3/8" ply + 3/8" particle board. I used water seal on the exposed portions of the new plywood. This should protect them somewhat though we plan to undercoat the trailer when back together. The new flooring went in easily with deck screws. I glued & screwed in 1x4 where the plywood flooring joined each other.
 |
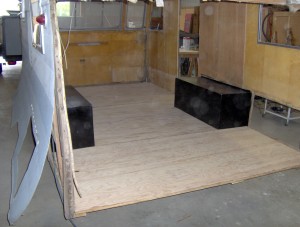 |
After building the new wheel-wells I realized the original flooring was made up of two pieces of 4x8 plywood. The drops after cutting to 6'4" wide plus the cut outs for the wheel-wells made up the rear most floor. Good way to conserve plywood but not optimum for structure. I used three pieces of 3/4" plywood for the new floor. However, I may have been possible to make the wheel-wells smaller and gain some interior space. Wouldn't be much and in inconvenient places but could have been done.
Keep in mind this is a restoration not a redesign.
While the new floor was going in Denise was busy polishing window frames. Two are done and look very nice. We've ordered new window molding from Vintage Trailer Supply for these.
The next step is probably to pull the frame from under the body. This should be easier than trying to take the dings out than trying to do it with the body on, even with the floor out. With the frame out I can use a torch to heat and bend the frame a bit. Then sand-blast or wire brush before putting the frame back. Should be another adventure.