
August 2012 - Shasta Renovation
Good progress this month. With luck we should be using Shasta by the end of Septmeber, not finished but enough to be useable.
August saw the interior finished or nearly finished. Below is a blow by blow description of our progress.
Framing:
The manufacturer used three strips of 1/4" plywood 3/4" wide between the roof plywood and roof skin. This was continuous and the rafters, roof supports, only butted up to this strip being toe nailed to the roof framing. This seems like a poor solution to me. I used solid 1/4" strips instead of plywood. These I glued togther using the roof as a form, screwed and clamped to the framing while the glue dried. I then cut these composites to allow rafters go to the edge of the framing. The picture below shows the structure.
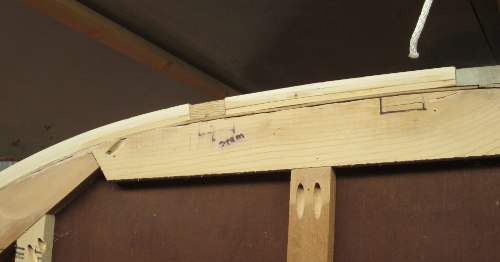
In the front I used 6 1/8" strips where the curve of the roof was sharper.
Propane:
Hard to take a picture of the propane lines under the trailer. However, all the appliances have been plumbed in. The original trailer only have the stove and dinette light using propane. The new version added a refrigerator and furnace. 3/8" copper lines to all but the dinette light where 1/4" was used.
Wiring:
The original version had only two lights, one in the dinette and one in the bedroom. Both these were 110V and there was no 12V system. We expanded this for boondocking.
We added 12V lights, two LED lights in the bedroom and four LED puck lights under the kitchen cabinets. We also wired in the new 12V FanTastic ceiling fan and 12V to run the new Suburban furnace. Finally, we put a 12V cigarette plug in the dinette seat bases on both sides. These should be useful for computers, cell phones, etc. For the 110V system we kept the dinette light (and plug) as well as ran wires for the AC/propane refrigerator. Finally, next to the dinette 12V plugs we put a 110V outlet on each side.
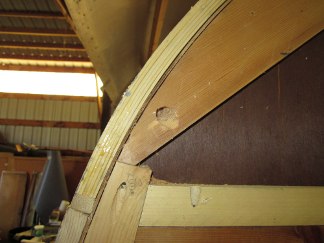
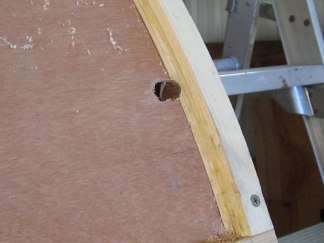
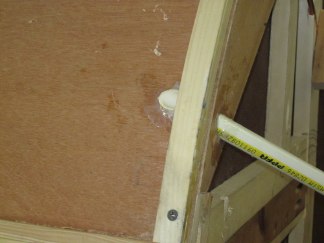
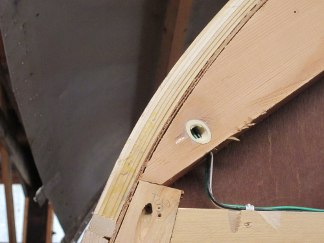
The original wiring was all in the left (street side) wall. With the extra runs we now have wires running around the corners of the trailer. I was worried about putting a screw through the wiring when putting the skin back on. So, I drilled holes through the corners as needed, then a length of plastic pipe for the wiring. The pipe wasn't as much for the wires as to cover them as they pass through the cabinets. The pipe angles through a couple of cabinets 1/2" or so, hardly noticable. The pictures below show the hole drilled, the plastic pipe epoxied in, and the final wiring. The whole concept worked well.
 |
 |
 |
 |
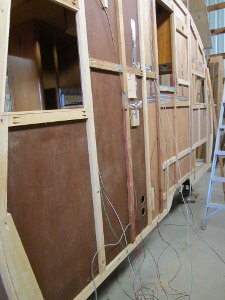
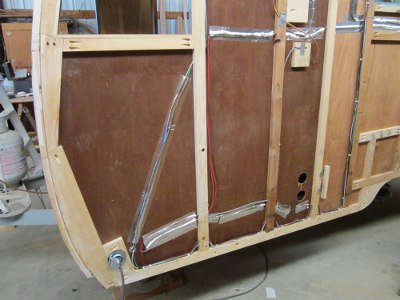
Running the wires to all these places took some time. The two pictures below show the mess of wires as the runs were made, and a somewhat more organized final shot. I used a combination of stapling wires to the framing and taping them to the walls. It may be harder to put in the 3/4" rigid insulation with the wires taped to the wall, we'll see. In the picture below you can see the new 110V electrical inlet near the front. Quite an improvement over the free hanging plug she came with.
 |
 |
All the wiring comes through the wall into the left dinette seat support. I dedicated this to electrical and the return air for the furnace. I hate to lose the storage space but the electrical needed to go somewhere.
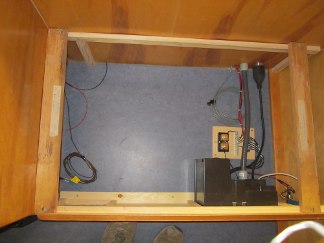
I obtianed a Progressive Dynamics 4045, a battery charger/converter installed in a relay box. It has a main inlet relay plus an additional three 110V relays. Also twelve fused 12V circuits. You can see it in the first two pictures below. I ran a cable from the AC inlet to this box and a 30A fuse. The AC circuits run out through a flexible conduit. The three 15A relays in the Progressive Dynamics box run the refrigerator, all the outlets in the dinette, and finally the charger/converter itself. The 12V circuits are wired to a terminal strip (positive) and a ground bar (negative). The Progressive Dynamics box seems to work well but the installation manual is very poor.
 |
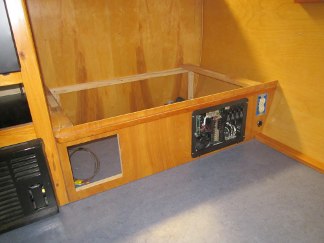 |
I plan to put two 80Ah AGM batteries in this cabinet. That should give us the juice to go four or five days off grid running either the furnace (winter) or ceiling fan (summer). The LED lights draw so little the batteries would run them "forever". It's not optimum (i.e. don't do it) to put batteries in an unventilated place, like this cabinet. However, from all I can find we should be OK putting AGMs here, they are sealed and don't outgas hydrogen. Likely wouldn't fly for a commercial product, but for my own use I'll go with it. The batteries came at the end of the month and I haven't had the time to install them yet.
There is a shunt in the picture above to measure current into and out of the batteries. The batteries are so expensive I thought a battery monitor was in order. I've purchased a Trimetric 2020 Battery Monitor system with shunt. It monitors the current into and out of the batteries, the best way to monitor change, and keeps track of battery voltage. Two wires connect it to the shunt and another two wires for battery voltage. You can see it mounted in the kitchen cabinet shown below.
I haven't gotten the batteries, and thus the Trimetric, hooked but so I don't know if it works yet.
Water Tank:
I love the water system in our '55 Shsata. A water tank is mounted above the sink, open a valve get water. Not much mechanically can go wrong. But the galvinized water tank has leaked in the past and was again starting to leak. I found a new plastic tank from Plastic Mart. The tank was the right size and they put fitting on as specified. The tank installed in the cabinet over the sink is shown below. I carefully blocked opening to the sides and back of the tank, it would be a royal pain to loose something important back there.
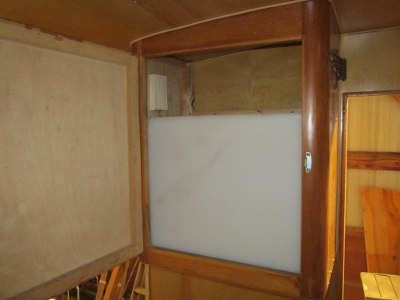
The hope is that it'll be translucent enough to see water lever.
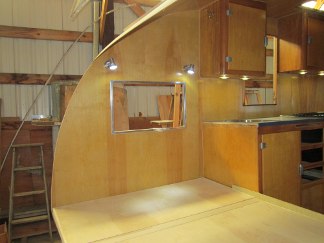
Interior:
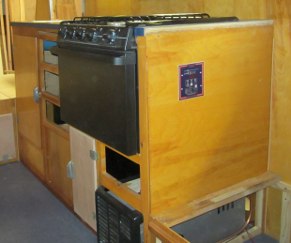
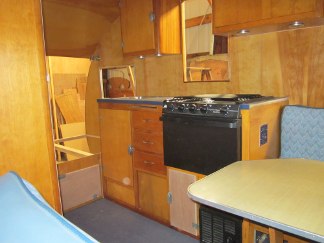
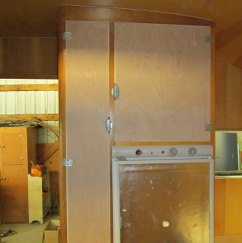
The cabinets went back in without too much trouble, just took a long time. The kitchen was finished up last fall and simply mounted in place. Well, with lines for propane added. The first and second pictures below show the LED lights. The closet became much narrower due to the added width of the refrigerator. The cabinet above the 'frig became larger though. Due to changes in size four new cabinet doors needed to be made. As shown below they have yet to be stained and polyurethaned, we're now doing that. I still need to build a new drawer to go above the furnace. The seats for the front dinette were recovered a year or so ago, before we know how long this renovation would take. The updated dinette is shown in the last picture below.
 |
 |
 |
 |
Still need to remake the table to match the kitchen, but till then the old table will work.
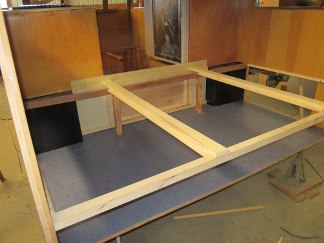
Bed Frame:
I remade the bedframe. I believe the original had 1"x3" or 1"x4" slats from the front to rear support with plywood over these. I can't find the plywood to confirm this but it's what my wife and I remember. The slats seemed to be too short when I placed them back in. Then I realized the original slats are 48" while the span is 49", Shasta simply skimped on the length to get way with getting two slats from one 8' board.
The pictures below show the configuration I came up with. I used only two 1"x3" supports with a 1/2" board under this to support the plywood. However, instead of plywood I built a sandwitch of 1/8" birch ply top and bottom with 1/2" rigid foam inbetween. This comes out 3/4" and matches the supporting 1x3s. This sandwitch is very sturdy and stiff, plus add some insulation. The pictures below show the supports and sandwitch pieces.
 |
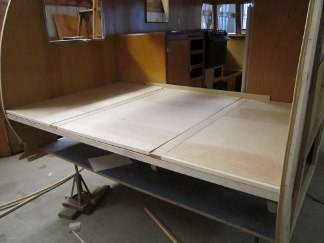 |
If you look closely you'll see a cap piece on the ends of the sandwitch but not the sides. Like Shasta I didn't want to buy double the number of 4'x8' sheets of birch to get 49" lengths. The caps "extend" the length 1" (to 49"). I do like the way this structure came out. We'll polyurethane all of this but not bother with a stain, it can't be seen by the casual visitor.
Interior To Do:
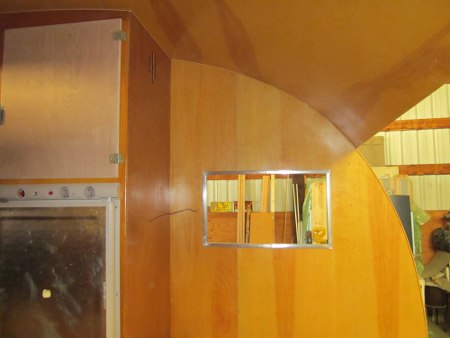
The last major ineterior item is a shelf on the right over the bed. The 1955 came with a hammoc over the rear bed. We never used this so won't re-install it. This leaves room for an extra shelf in this area. The space is above the window in the photo below. In this picture you can just see the thermostat wire in the cabinet where the thermostat will go, it's wired over to the furnace.
Besides this cabinet there isn't a great deal to do inside. I need to build and install splash guards on both ends of the kitchen as well as a backsplash. If you look closely at the kitchen above you can see the raw plywood on the cabinet ends. I need to make a grate for the furnace air return. You can see the opening in the left dinette above, and see it needs a grate. Finally I need to install birch trim over the plywood joints in wall and ceiling, and maybe some floor molding. Oh ya, and that missing drawer.
Onward:
So, next I'll put a water seal on the framing and plywood. I tried this before but it started bleeding through to the interior birch. I tried a small section after the birch was polyurethaned and it didn't show, so I'll do the whole trailer. Then cut and tape into place 3/4" rigid insulation on the walls and ceiling, and on to re-installing the skin.
Lotsa pesky details left, like fitting the new door, rebuild the utility doors, dinette windows, etc. But it now feels like there's a chance it'll get done. Woo Hoo!