First Cue - Joints
A-Joint
The forearm and handle were next connected together. A hole was drilled into the forearm, sized for a 3/8-10 tap, a recess was bored, and the remaining hole was tapped. In the handle a similar hole was drilled and tapped, then a tenon was cut using lathe tooling. The tenon was sanded for a tight slip fit into the forearm bore. These operations were done in the lathe using a tapered nylon collet in a four jaw chuck. It was centered in the four jaw using the drilled centers previously used for cutting. Small slots were cut around and lengthwise on the tenon so excess glue had a place to exit. A 2.5" length of 3/8-10 stainless threaded rod was used to pull the parts together. Finally, along with one black ring, the forearm and handle were joined using 15 minute epoxy.
Finish Cut
Now the handle and forearm have been connected to form the cue butt. Before the drilled centers are lost a finish cut was made. About 0.005" was left for sanding. The butt was mounted in the Sherline on the knee mill. It was first mounted with the forearm to the right and the taper was finish cut. The butt was then flipped 180 degrees so the handle could be finished. Remember, the knee mill travel prevents cutting the whole butt at one time. The recess for the wrap was rough cut.
Joint
Once the butt has been finish turned the joint, butt to shaft, was made.
I decided to go with a Cuetec Avid shaft. It is a lower cost low deflection shaft cored with maple and covered with fiberglass. More expensive low deflection shafts tend towards carbon fiber. It should be more damage resistant than a bare maple shaft, and is at least advertised as low deflection.
Suppliers of pool cue parts/materials have a wide selection of ready made joint pins. But no-one makes a pin for Cuetec cues. Cuetec advertises their pin as 3/8"x14 for which taps and dies can be had. But it turns out the Cuetec thread is not 3/8"x14. As near as I can tell, through research and reverse engineering from the shaft, it's a 9mmx14TPI. Yes, a metric thread with TPI (threads per inch). This took a lot of measuring and test fitting, learned again how to use thread wires. It does look to be a standard 60 degree thread form.
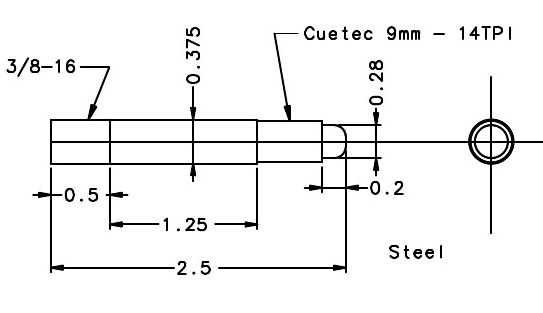
I cut a pin from stainless steel, a drawing is shown below. The 9mm thread matches the shaft thread. A straight 3/8" center section is for alignment, to align with a reamed hole. The 3/8-16 thread is to hold the pin, along with glue, laterally in the forearm. A narrow slot was cut from the 3/8-16 thread end up to the 9mm thread root. This to allow excess glue a path to escape the joint.

The shaft end of the butt was mounted in the lathe, again using a tapered nylon collet. A tenon was first cut on the forearm to accept rings and the joint collar. These were glued on using 5 minute epoxy. A small hole was drilled in this cap to allow excess glue to escape. In the lathe the tailstock as used to press this stack onto the cue. The joint collar was machined on the OD to fit the forearm and faced square on the end.
The hole for the joint pin was then machined. This involved center drilling, drilling an undersized hole, boring with a boring bar to take it near final dimension, and finally reaming. I believe the alignment of this pin is critical to alignment of the shaft. Finally a hole was drilled and tapped at the bottom to accept the 3/8-16 thread of the pin. The pin was glued into place with 15 minute epoxy while in the lathe. An indicator was set up and the pin pushed slightly sideways until the TIR was zero. It was initially out a few thousands. Excess glue was removed and the part left to cure.
The butt was turned around and held in a nylon collet for access to the bottom. The butt cap was then installed using 15 minute epoxy. Again a small hole was drilled to let excess glue out and the tailstock used to hold while it cured. Once cured the outside of the butt cap was trued up with the butt sleeve and rings. Finally, a hole was drilled into the handle and tapped 1/2-13 for weight bolts.
A weight bolt was made up from stainless threaded rod. It was simply slotted on the end for insertion and removal. A smaller thread is tapped into the center of the weight bolt to hold a rubber bumper onto the butt cap.
The recess for an Irish linen wrap was cleaned up. The butt was mounted in the lathe using adapters at the weight bolt thread and joint pin. The ends of the wrap recess was squared up.

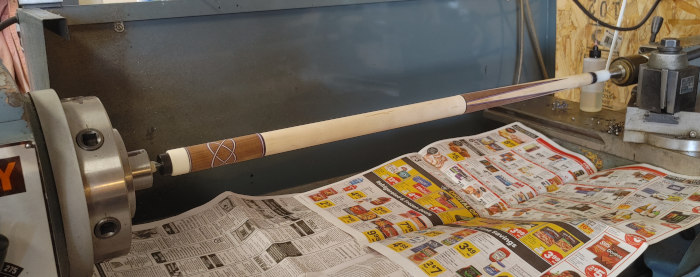
It is nearly a completed cue. Just the finish and wrap left.
Cue #1 : Main Finish